Laser Cutting
In this page, I will describe:
1.
The 4 important hazards associated to the operation of laser cutting
machine and their respective safety control measures
(administrative/engineering control).
2. The materials that can be cut and can’t be cut using laser cutting
machine.
3. The steps including pictures on the operation of UNIVERSAL laser cutter,
that consist of:
a.
Starting the compressor, turning on the laser cutter machine and fume
extractor.
b.
Importing a .DXF file to coreldraw and modify the lines/fill for cutting
and engraving.
c.
Sending the coreldraw drawing to laser cutter software and setting the
laser cutter power, speed, PPI in the software.
d.
Starting the job on the laser cutter machine.
e.
DOs and DONTs when there’s flame/fire on the material being cut.
4.
My Learning reflection on the laser cutter activities.
1.
These are the
4 important hazards and the respective safety control measures on the operation
of laser cutting machine:
|
Hazards |
Safety control measures |
Pictures to support the explanation |
|
1. Material Catches Fire (Stays on fire)/ Fire Hazard
|
1) Any flame MUST DIE OUT within 1-2 seconds. If the flame persists, lift the lid of the laser cutter and stop the cutting operation. 2) If the fire is negligible, try putting it out by blowing it off 3) If the fire is unable to blow off, remove the material, place it on the floor and step on it 4) If the fire is uncontrollable, go to the closest fire extinguisher and put it out. |
  -Emergency stop button in case of uncontrollable fire -Fire extinguisher located outside Laser cutting room |
|
2. Toxic Fumes and Gas may be emitted (Chemical hazard) |
|
 |
|
3. Staring at the Laser will damage your eyes |
|
 |
|
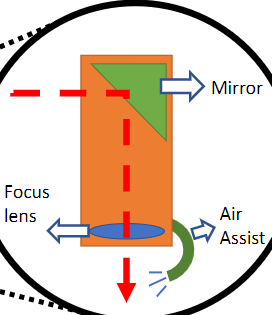
4. Dust and soot will make focus lens dirty which will cracked when used |
|
 |
2.
Below are the
materials that can be cut/engraved using laser cutting machine in FabLab.
|
Material |
Photo of material |
|
1. Plywood (Laserply only) |
 |
|
2. Acrylic |
 |
|
3. Cardboard |
 |
Below are the
materials that can’t be cut/engraved using laser cutting machine in Fablab.
|
Material |
Photo of material |
|
1. Metal |
 |
|
2. Polyvinyl Chloride (PVC) |
 |
|
3. Rubber |
|

3.
Below are the
steps on the operation of UNIVERSAL laser cutter machine in FabLab:
a.
Starting the compressor, turning on the laser
cutting machine and fume extractor.
|
Steps and
description |
Photos to
support the description |
|
1. Switch on the power for laser cutter, air assist and Extractor |
For T1442   |
|
2. Depending on which venue you use, follow accordingly: If you are in T1442, switch on light switch. If you are in Makerspace, switch on power for fume extractor |
Makerspace  |
b.
Importing a .DXF file to coreldraw and modify
the lines/fill for cutting and engraving.
|
Steps and
description |
Photos to
support the description |
|
Select File > Import > Select your .DXF file and |
 |
|
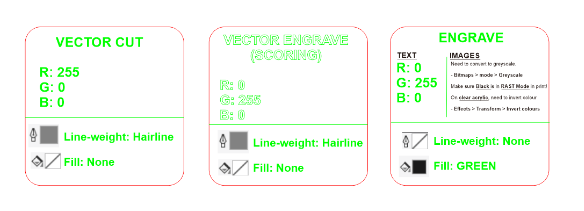
Once imported, choose between Vector Cut, Vector Engrave or Engrave |
 |
c.
Sending the coreldraw drawing to laser cutter
software and setting the laser cutter power, speed, PPI in the software.
|
Steps and
description |
Photos to
support the description |
|
1) Click on File > Print |
 |
|
2) Click on the Cogwheel for
Universal's material settings |
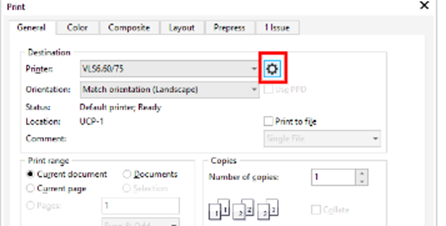 |
|
3) Click on Load for more
material setting |
 |
|
4) Select the presets that matches
material type and thickness and select Open |
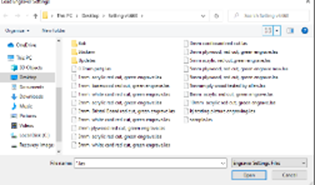 |
|
5) Check the Power, PPI, Speed,
and Z-axis. Once done, Click OK |
 |
d. Starting the job on the laser cutter machine.
Placing the Material
|
Steps and
description |
Photos to
support the description |
|
1) Check the Horizontal and Vertical side of the Built-in Ruler
and and use the Move tool, in order to move the object to the empty space of
the Spare Material. ( If using Fab-Lab Provided material) |
 |
|
2) With the Lid open, Click on Focus tool, and a crosshair will
appear. |
|
|
3) To Check if file is within the safe cutting area, Click on
extreme bottom-right corner of the file, followed by
clicking on the top-left corner of the file |
 |
|
4) Check for timing by clicking the Estimated time
button and click Start (NOT PLAY) |
 |

e. Ready to Cut
|
Steps and
description |
Photos to
support the description |
|
1) If all is good, Close the lid gently |
|
|
2) Press either the Play button on Universal
Control Panel, or the Physical button on the Laser Cutter |
 Play Button on UCP  |
|
3) Monitor by Glancing ( DO NOT STARE at
the beam) |
 |
|
4) Once done, Allow the extractor to remove the toxic smell and
particle for preferably a minute. |
|
|
5) Gently lift up the lid, but do not remove
material |
|
|
6) In order to test if the material was indeed cut, tap on the
cut material to see if its free from the main material |
 |
|
Steps and
description |
Photos to
support the description |
|
1) Remove any unwanted material and dispose them |
 |
|
2) Deactivate the Laser Cutter |
|
|
3) Switch off necessary switch |
|
|
4) Need not shut down PC |
|
DOs and DONTs when there’s flame/fire on the
material being cut.
|
DOs and
DONTs |
Photos to
support the description |
|
|
|
|
|
|
|
|
|
4.
Below is my Learning
Reflection on the laser cutter activities.
So during the day of the competency test, while waiting we went through the steps over and over again, to which I was told by a friend that if it did not change from coral draw to UCP, manually change it. Another friend of my also told me to choose number 3 as she do not want her emoji that she made and wanted to trade with me.
When I entered, I did everything accordingly, until I did not, I forgot to press print and see that it have not change from coral draw to the UCP, hence I followed my friend advice and change it manually. Hence, I print the previous person chosen design.. When I first take out the item, I was slightly confused but did not question it, because I did not remember my design being a dog but I thought I was just on copium as I did not remember what my design was in the first place. Next second, the invigilator told me I did not press print and that is not my design. Hence, I failed and have to redo the competency test, which I was actually glad as I can print the correct design this time round
So during the re-test, I completed the laser cutting in 3 minutes and went on with my life
Comments
Post a Comment